- Messages
- 2,685
- Reaction score
- 8
- Trophy Points
- 48
1) Introduction
This guide is intended to give you a starting point (nothing more) to handling 4k using cross-platform tools. It neither provides lessons in color science nor teaches you the basics of video. The guide assumes (for now) that the average user taking advantage of a UHD source intends to convert to, and edit in, standard HD; however, the commands given can be easily adapted to those wishing to retain 4k or "HDR" (or both).
Tools
Install the following cross-platform tools. Linux users will find that they are available to them either in their distro's repos or as AppImages/Flatpaks/snaps.
2) Ripping and Demuxing
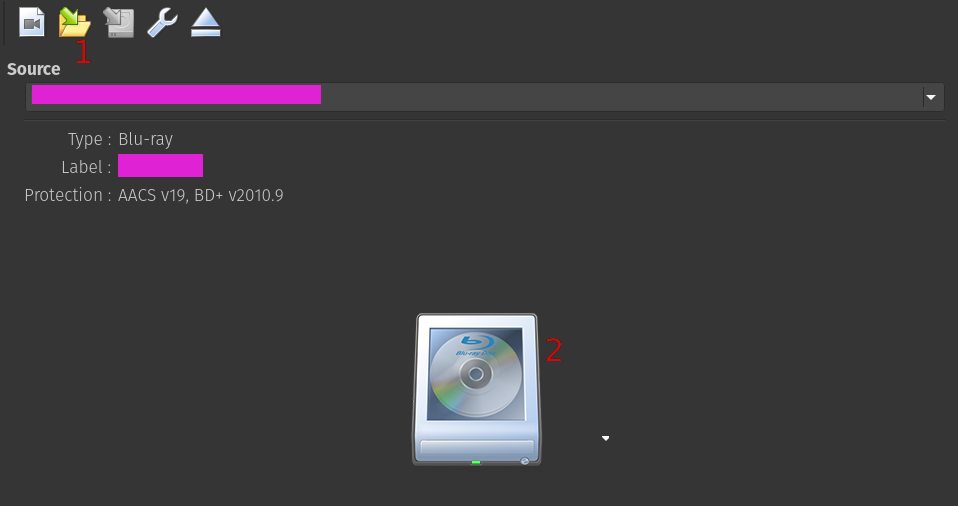
This section assumes that you have a drive that supports UHD BD ripping. Rip your own disc using MakeMKV, which presents the user with two options.
As long as scanning the titles presents you with the assets that you want, choosing option 2 will save you some time. If you need the full disc, proceed with option 1, ensuring that the option to decrypt the video files is selected, and then fire up MKVToolNix. Right-click on the Input panel, and select Add files. Open the directory where you made the backup, navigate to BDMV->Playlist, and choose any playlist. If there are multiple playlists, MKVToolNix will ask you if you wish to scan them: do so, and select the one you need. Remux to MKV.
3) Decoding
Fortunately, ffmpeg can handle progressive content encoded as progressive really well, and that is the majority of UHD BDs. If MediaInfo reports that the video in your MKV is progressive and either 23.976fps or "pure" 24fps, you should be fine.
Option A: ProRes
This is the option that I recommend.
The following command tone-maps your UHD BD, downscales it to 1920x1080p in the Rec. 709 color-space with levels in the TV range (16-235), and outputs a 10-bit YUV 422 ProRes video in a MOV container. Pull up a terminal/command-prompt, and CD to the directory that contains your MKV.
Don't worry about the details. The only thing you need to do is change input.mkv to match your file. (In fact, if you change the name of your MKV to input.mkv, you don't even need to do that.) Windows users who haven't added ffmpeg to their path will need to change ffmpeg to the location of ffmpeg.exe on their system, e.g., "C:\whatever_path\ffmpeg.exe". If you want 720p instead of 1080p, change scale=1920:1080 to scale=1280:720. When you are ready, run the command.
ProRes is an industry-standard intermediary codec of high quality. It is very easy to edit and regrade. The output of the above command has been confirmed to open in Blender, DaVinci Resolve, Kdenlive, and Adobe Premiere Pro.
Option B: FFV1
N.B. Make sure that you have read the explanation for Option A first.
The following command will tone-map your UHD BD, downscale it to 1920x1080p in the Rec. 709 color-space with levels in the TV range, and output a 8-bit YUV 420 FFV1 video in an MKV container. What this means in plain English is that you it gives you a video whose properties are identical to those of a standard blu-ray, giving you more or less the same starting point.
That's it! You can even use the output of option B as the basis of a straight UHD-to-BD conversion and proceed to encoding with x264. (In fact, that's what I use this option for.)
Closing Remarks
The ffmpeg commands given above can be modified to output a file with more or less any kind of attributes you like: RGB, 8 bit, 10 bit, full range, TV range, Rec 601, lagarith, HuffYUV, and so on. You will have to research those for yourself and figure out what combination works with your editing program and fits your use-case. Read the ffmpeg documentation, and do some research on Doom9's forum or VideoHelp.com. Learn to use the scopes that most NLEs provide; that way, you can monitor your video's levels. Make some test clips, and do some renders before you start editing, to check your workflow. And have fun!
This guide is intended to give you a starting point (nothing more) to handling 4k using cross-platform tools. It neither provides lessons in color science nor teaches you the basics of video. The guide assumes (for now) that the average user taking advantage of a UHD source intends to convert to, and edit in, standard HD; however, the commands given can be easily adapted to those wishing to retain 4k or "HDR" (or both).
Tools
Install the following cross-platform tools. Linux users will find that they are available to them either in their distro's repos or as AppImages/Flatpaks/snaps.
- ffmpeg
- MakeMKV (free while in beta)
- MediaInfo
- MKVToolNix
2) Ripping and Demuxing
This section assumes that you have a drive that supports UHD BD ripping. Rip your own disc using MakeMKV, which presents the user with two options.
- Make a full backup. (yellow folder)
- Scan titles on the disc, and demux them to MKV. (drive icon)
As long as scanning the titles presents you with the assets that you want, choosing option 2 will save you some time. If you need the full disc, proceed with option 1, ensuring that the option to decrypt the video files is selected, and then fire up MKVToolNix. Right-click on the Input panel, and select Add files. Open the directory where you made the backup, navigate to BDMV->Playlist, and choose any playlist. If there are multiple playlists, MKVToolNix will ask you if you wish to scan them: do so, and select the one you need. Remux to MKV.
3) Decoding
Fortunately, ffmpeg can handle progressive content encoded as progressive really well, and that is the majority of UHD BDs. If MediaInfo reports that the video in your MKV is progressive and either 23.976fps or "pure" 24fps, you should be fine.
If the movie is 25fps, it will most likely be progressive content encoded as interlaced. The following will most likely work, but you will have to check the output carefully for decoding errors, which usually manifest themselves as intermittent break ups in the picture.
This is the option that I recommend.
The following command tone-maps your UHD BD, downscales it to 1920x1080p in the Rec. 709 color-space with levels in the TV range (16-235), and outputs a 10-bit YUV 422 ProRes video in a MOV container. Pull up a terminal/command-prompt, and CD to the directory that contains your MKV.
Code:
ffmpeg -i input.mkv -vf "zscale=t=linear:npl=100,format=gbrpf32le,zscale=p=bt709,tonemap=tonemap=hable,zscale=t=bt709:m=bt709:r=tv,format=yuv422p10le,scale=1920:1080" -sws_flags sinc -f mov -c:v prores -pix_fmt "yuv422p10le" -profile:v 3 -an -y output.movDon't worry about the details. The only thing you need to do is change input.mkv to match your file. (In fact, if you change the name of your MKV to input.mkv, you don't even need to do that.) Windows users who haven't added ffmpeg to their path will need to change ffmpeg to the location of ffmpeg.exe on their system, e.g., "C:\whatever_path\ffmpeg.exe". If you want 720p instead of 1080p, change scale=1920:1080 to scale=1280:720. When you are ready, run the command.
ProRes is an industry-standard intermediary codec of high quality. It is very easy to edit and regrade. The output of the above command has been confirmed to open in Blender, DaVinci Resolve, Kdenlive, and Adobe Premiere Pro.
Option B: FFV1
N.B. Make sure that you have read the explanation for Option A first.
The following command will tone-map your UHD BD, downscale it to 1920x1080p in the Rec. 709 color-space with levels in the TV range, and output a 8-bit YUV 420 FFV1 video in an MKV container. What this means in plain English is that you it gives you a video whose properties are identical to those of a standard blu-ray, giving you more or less the same starting point.
Code:
ffmpeg -i input.mkv -an -vf "zscale=t=linear:npl=100,format=gbrpf32le,zscale=p=bt709,tonemap=tonemap=hable,zscale=t=bt709:m=bt709:r=tv,format=yuv420p,scale=1920:1080" -sws_flags sinc -pix_fmt yuv420p -c:v ffv1 -level 3 -coder 1 -g 1 output.mkvThat's it! You can even use the output of option B as the basis of a straight UHD-to-BD conversion and proceed to encoding with x264. (In fact, that's what I use this option for.)
Closing Remarks
The ffmpeg commands given above can be modified to output a file with more or less any kind of attributes you like: RGB, 8 bit, 10 bit, full range, TV range, Rec 601, lagarith, HuffYUV, and so on. You will have to research those for yourself and figure out what combination works with your editing program and fits your use-case. Read the ffmpeg documentation, and do some research on Doom9's forum or VideoHelp.com. Learn to use the scopes that most NLEs provide; that way, you can monitor your video's levels. Make some test clips, and do some renders before you start editing, to check your workflow. And have fun!