- Messages
- 8,735
- Reaction score
- 3,631
- Trophy Points
- 168
It has arrived! The Star Wars crawl template that you were looking for, I hope ")
While working on my edit of The Force Awakens, I needed to create a custom crawl and found it extremely difficult to produce anything that was close to the look of the official versions using Vegas and other NLE's. I did some research into Blender and found that it would be the best free alternative to create a good looking crawl. The following template and guide is meant to help any PC fan editor who is looking for a free option to produce a custom crawl for their Star Wars edits. I hope you enjoy this template. Thanks to everyone who has been supportive in the production of my TFA crawl that lead to this template. This one is for you
[align=center]How to use the Template
Preparation:
Blender Notes:
About the crawl:
The crawl in this template is created in much the same way that the Original Trilogy crawls were made in that the text itself does not move. This template rotates the camera to 70° and then animates the Camera movement to create the iconic crawl look.
Development of this crawl included countless hours of learning how to use Blender via Blender wiki’s, forums, and youtube videos. While I don’t have specifics for all of the information I mined in order to create this template, major thanks goes out to Chipper Videos’s “Blender Beginners Tutorial: Create A Star Wars Title Crawl That Looks More Like The Original Complete” video found on YouTube
Now you’re ready to begin.
Creating the Custom Crawl:
_Episode
_Body
_Render
Creating the SW Logo Zoom Out Fade:
*NOTE: This rendered file is already located in the download folder
Inserting the Logo and Crawl into your NLE:
[img=800x500]https://digmodification.files.wordpress.com/2016/09/sony-vegas-template-preview.png[/img]
*These steps are no longer needed if using the Vegas Project file
*please note that the Zoomed out SW Logo is produced using text and so the text will appear hollow when applying a chroma key later on.
This is not technically accurate, but I was unable to make blender recognize the image during rendering, so you may chose to use another source for the logo if desired.
I will attempt to rectify this problem for future updates.
If at any time you find yourself confused with using either the SW Zoom Out Logo and Custom Crawl Creator, please send me a PM
Happy Crawling!
While working on my edit of The Force Awakens, I needed to create a custom crawl and found it extremely difficult to produce anything that was close to the look of the official versions using Vegas and other NLE's. I did some research into Blender and found that it would be the best free alternative to create a good looking crawl. The following template and guide is meant to help any PC fan editor who is looking for a free option to produce a custom crawl for their Star Wars edits. I hope you enjoy this template. Thanks to everyone who has been supportive in the production of my TFA crawl that lead to this template. This one is for you
[align=center]How to use the Template
Preparation:
- Go HERE to obtain the Custom Crawl Creator template pack
- Go to https://www.blender.org/download/ and download the latest version of Blender
- Go to http://www.theforce.net/fanfilms/postproduction/crawl/opening.asp and click on the SW Crawl Title download and install the swcrawltitle font (a copy of this free font is located in the Custom Crawl Creator pack)
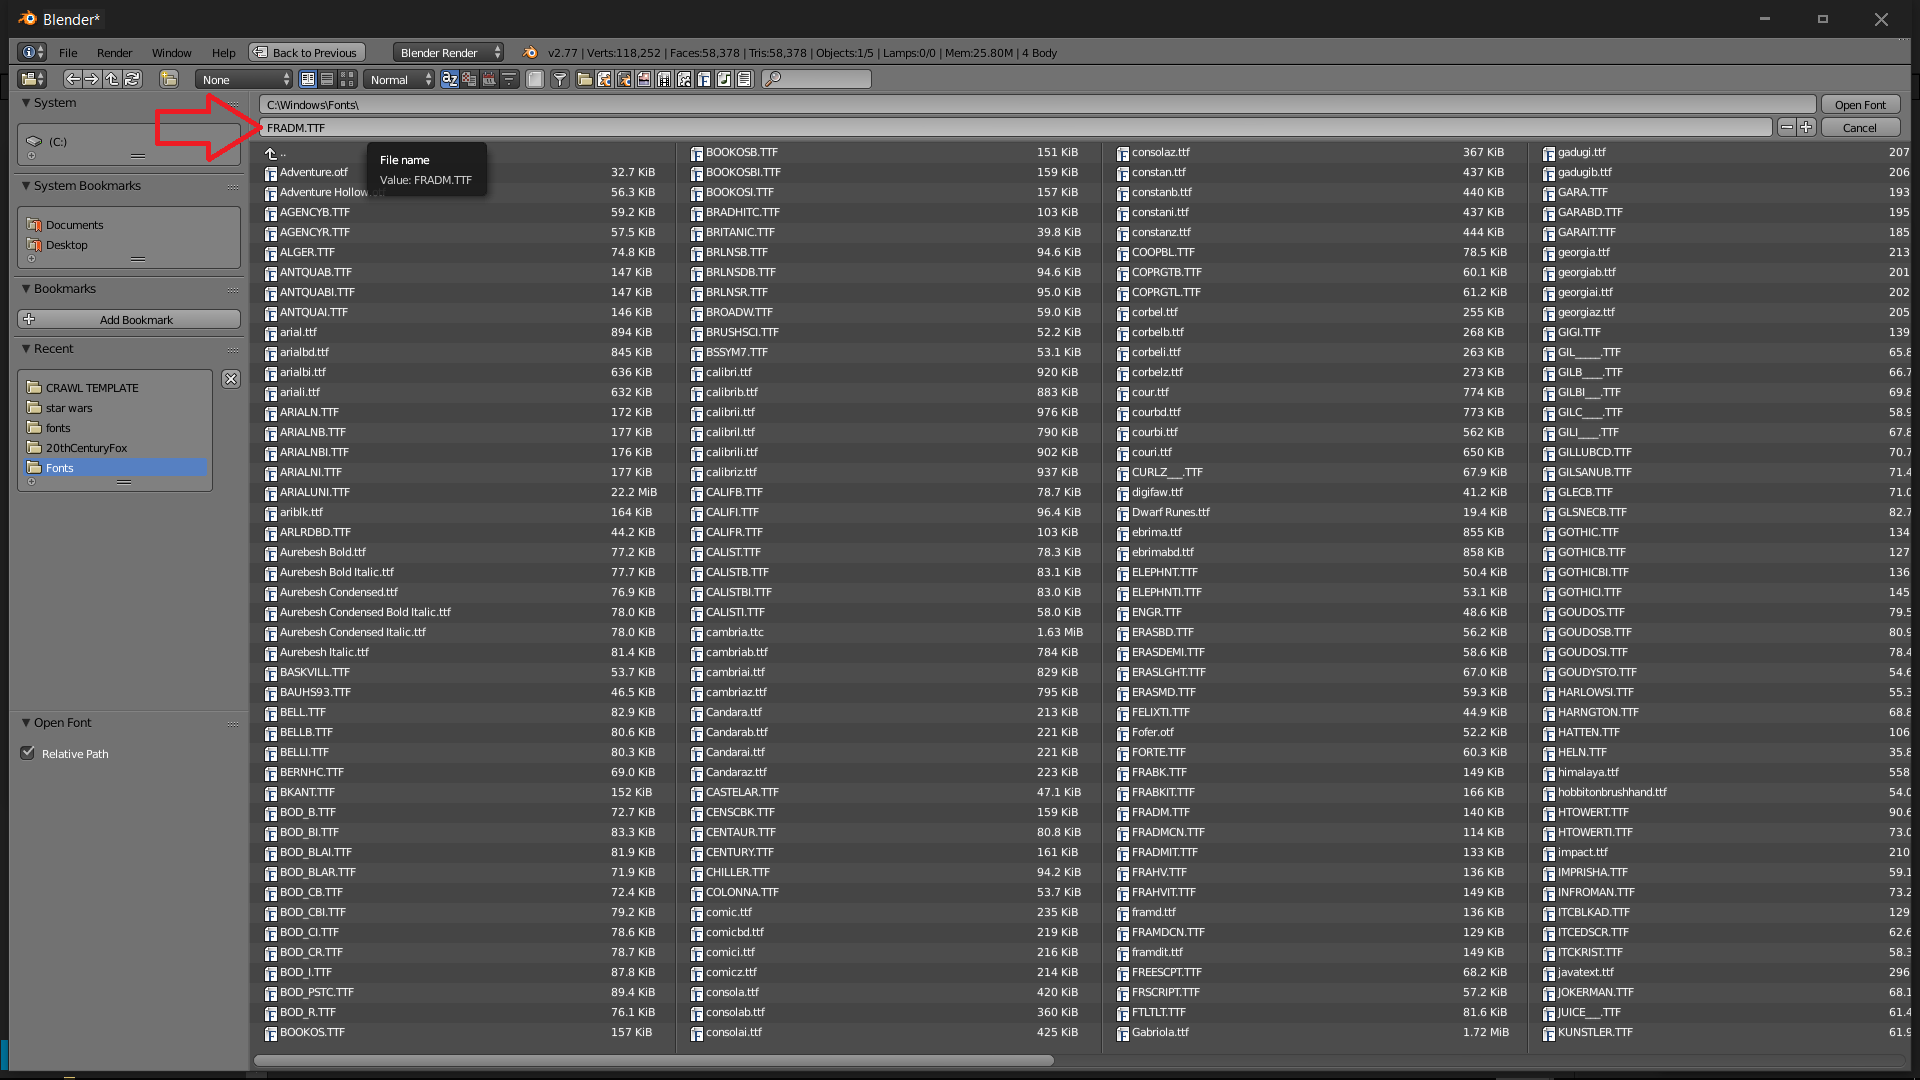
*UPDATE* Download the font Univers-LT-Std-59-Ultra-Condensed from https://profont.net/family/univers-lt-std.html (This will be used for the title. - Make sure that you have the FRADM.TTF font file installed in C:\Windows\Fonts\
Most windows PC’s come with this font preinstalled.
If you don’t have it you can get the SWCrawlBody font from the link in preparation 3 - Go to https://handbrake.fr/downloads.php and download and install OR make sure that you have a transcoder of your choice installed
Blender Notes:
- When using blender, enable your NumLock and use the number keys to change your view for easier working
- Make sure that the mouse is hovering over the previewer screen in the center when using the keys
- The default view for the template is the camera view
- Num5 will take you to an editing friendly zoomed out screen (press Num5 repeatedly to toggle between a flat view or a camera rotated view
- Num0 will return you to camera view (some computers assign a Fn function to the Num0, so you may need to disable FnLock to make this work)
About the crawl:
The crawl in this template is created in much the same way that the Original Trilogy crawls were made in that the text itself does not move. This template rotates the camera to 70° and then animates the Camera movement to create the iconic crawl look.
Development of this crawl included countless hours of learning how to use Blender via Blender wiki’s, forums, and youtube videos. While I don’t have specifics for all of the information I mined in order to create this template, major thanks goes out to Chipper Videos’s “Blender Beginners Tutorial: Create A Star Wars Title Crawl That Looks More Like The Original Complete” video found on YouTube
Now you’re ready to begin.
Creating the Custom Crawl:
_Episode
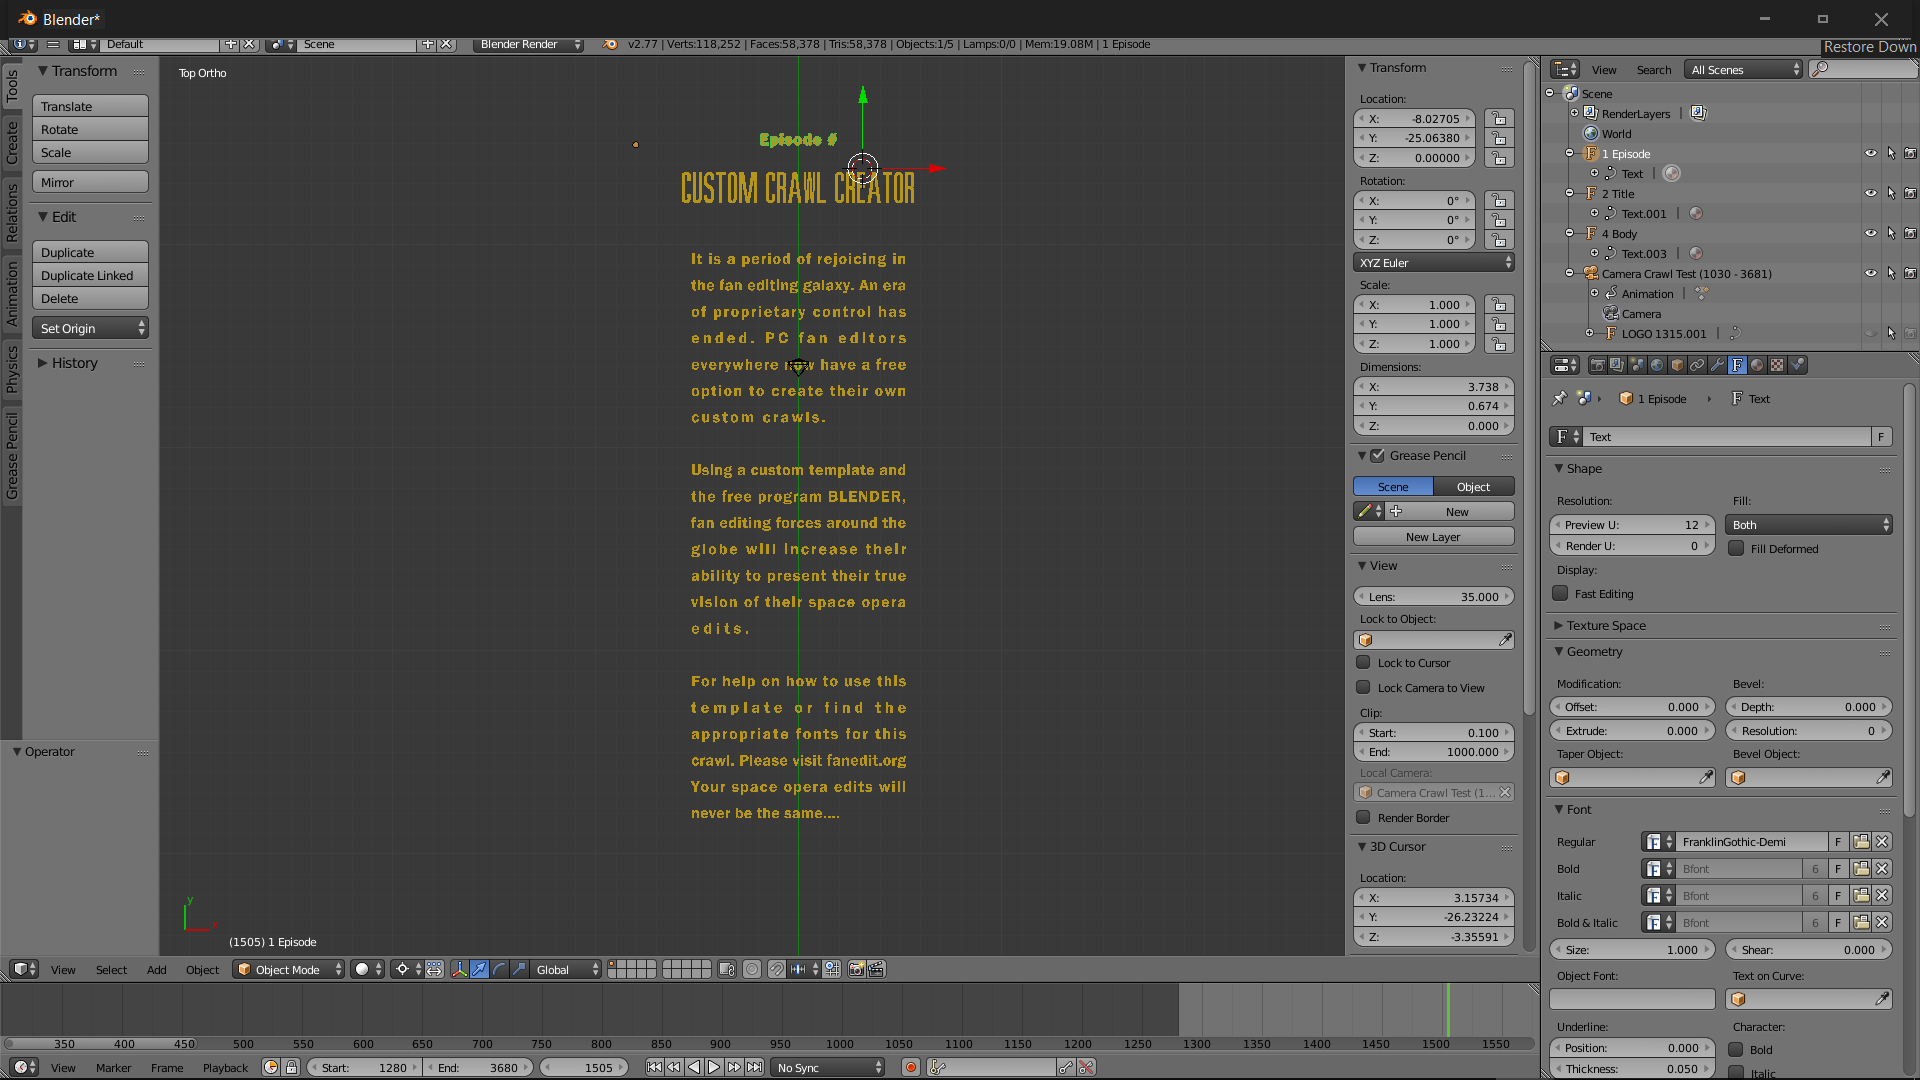
- Open the “Custom Crawl Creator” blender file located in the download folder
- Right click on the “Episode” text (text should be outlined in green once right clicked)
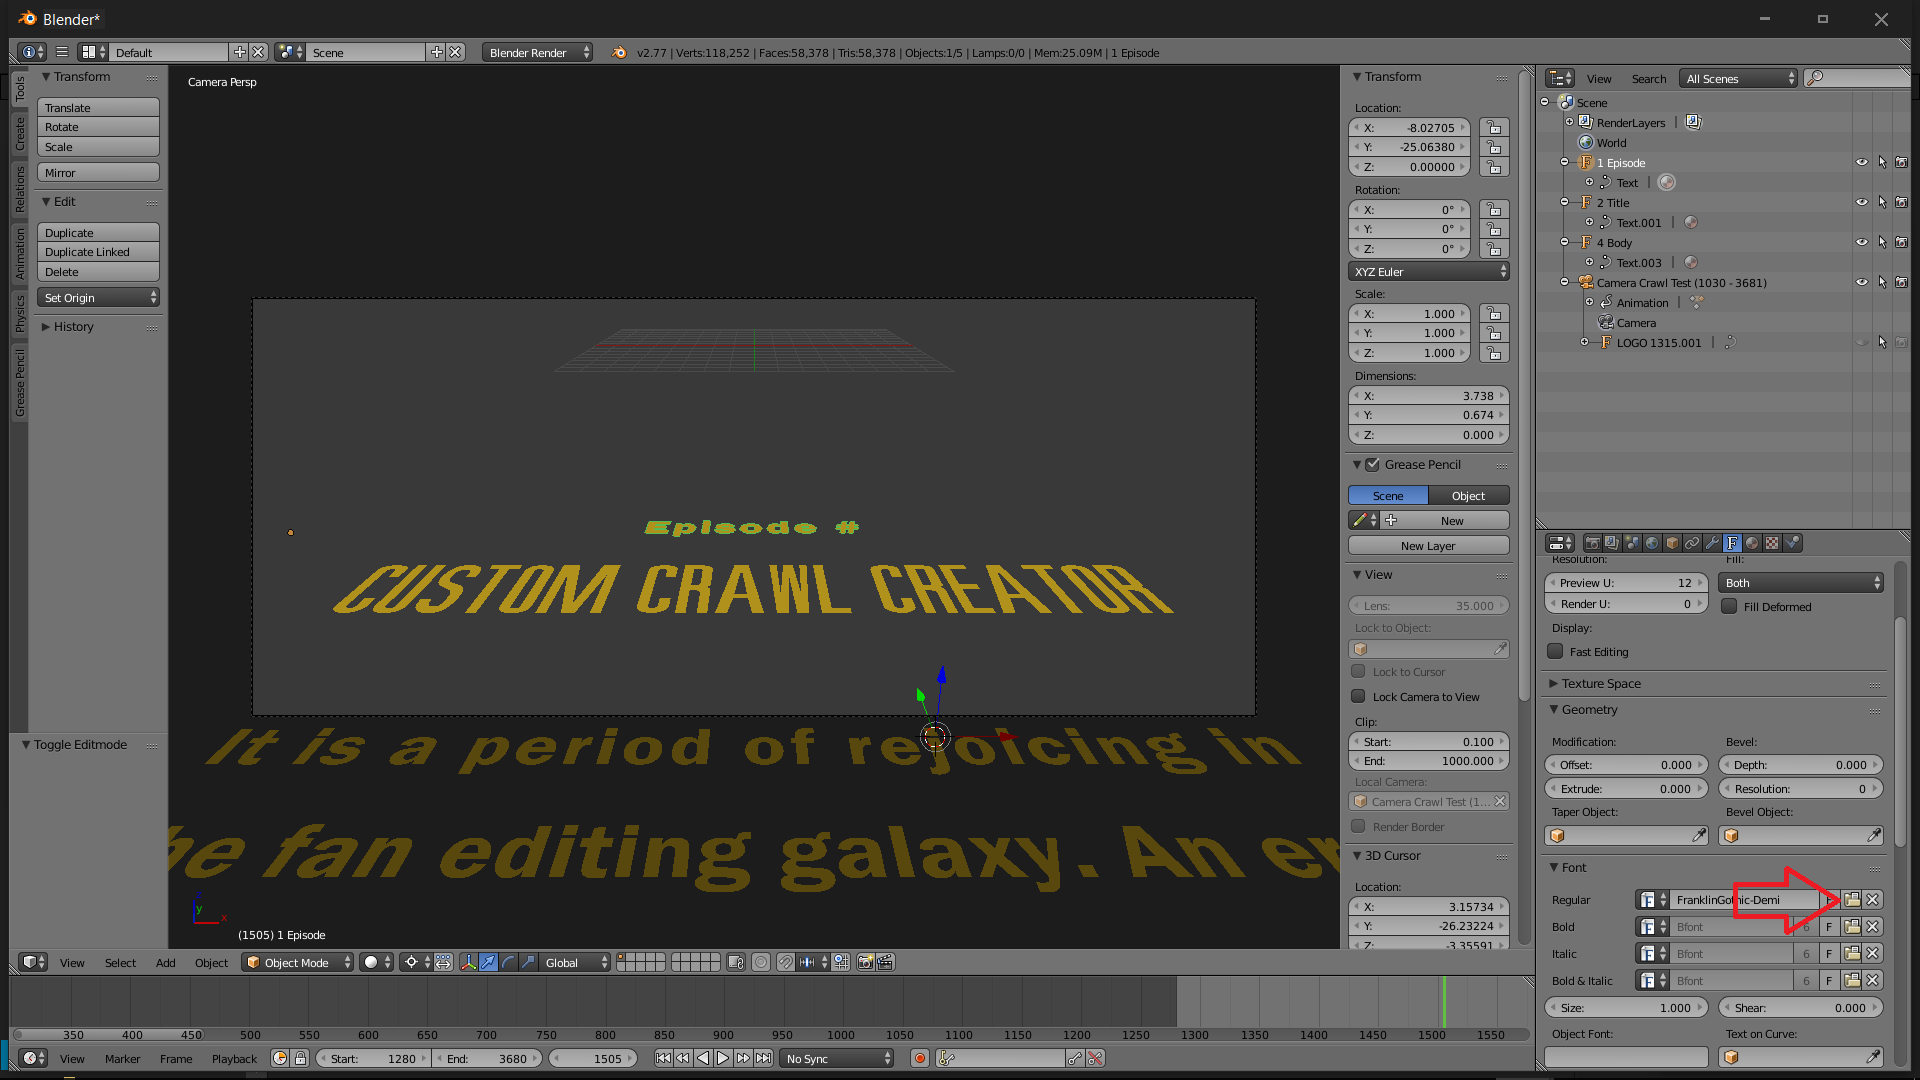
- Set font to “FRADM.TTF” which should be located in your C:\Windows\Fonts\
make sure to press “open font” when it is selected.
- Then press “tab” to enter into text editing mode and enter your episode # use ctrl+a to highlight the text and then ctrl+c to copy in your custom crawl
- Adjust justified text spacing as needed
- Press “tab” to exit text editing mode
- Right click on the “CUSTOM CRAWL CREATOR” text (text should be outlined in green once right clicked)
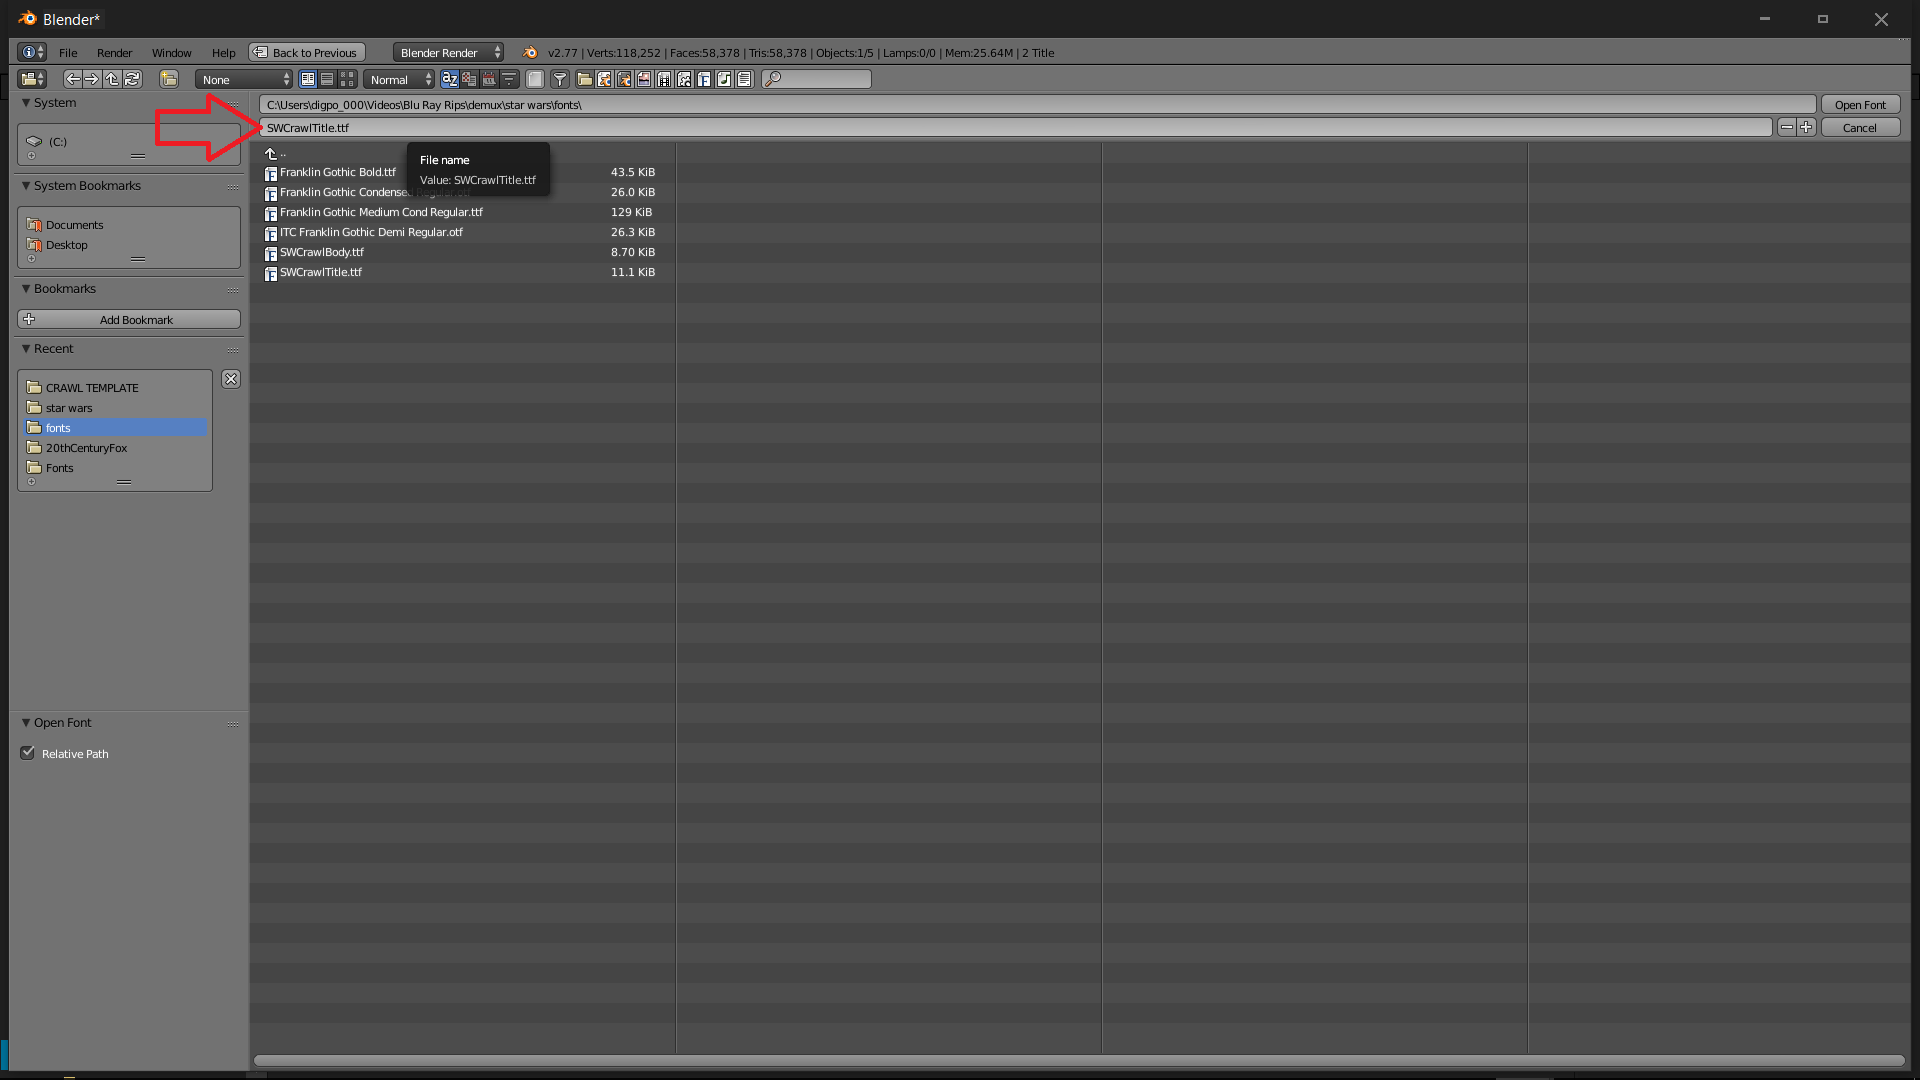
Set font to “SW Crawl Title.TTF” Univers-LT-Std-59-Ultra-Condensed which can be downloaded at https://profont.net/family/univers-lt-std.html
Set font to “SW Crawl Title.TTF” which is located in the download folder make sure to press “open font” when it is selected
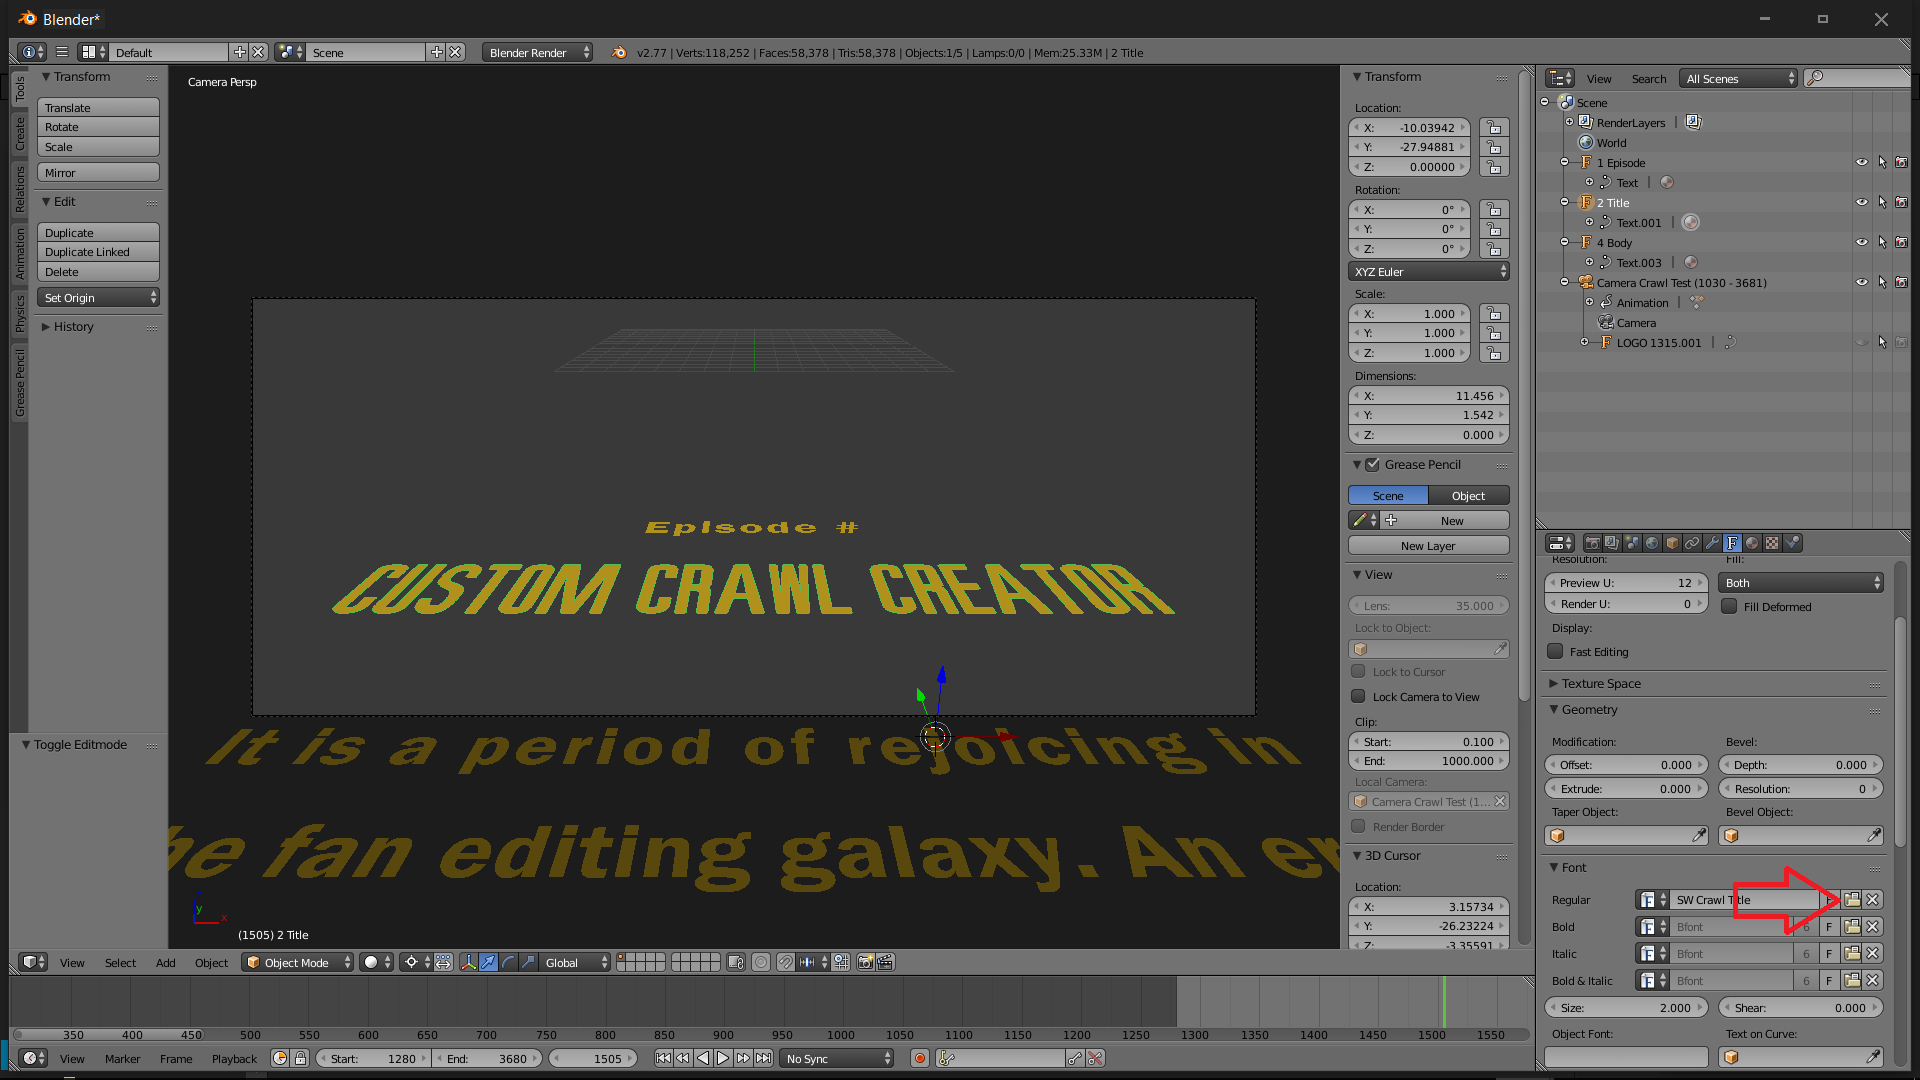
- Then press “tab” to enter into text editing mode and enter your title
NOTE: the SW Crawl Title font automatically capitalizes the text; capital "S" creates the SW Logo, capital "L" creates the “A long time ago, in a galaxy far, far, away….” text which can be useful for custom opening cards - Adjust justified text as needed
- Press “tab” to exit text editing mode
_Body
- Right click on the body text (text should be outlined in green once right clicked)
- Set font to “FRADM.TTF” which should be located in your C:\Windows\Fonts\
make sure to press “open font” when it is selected
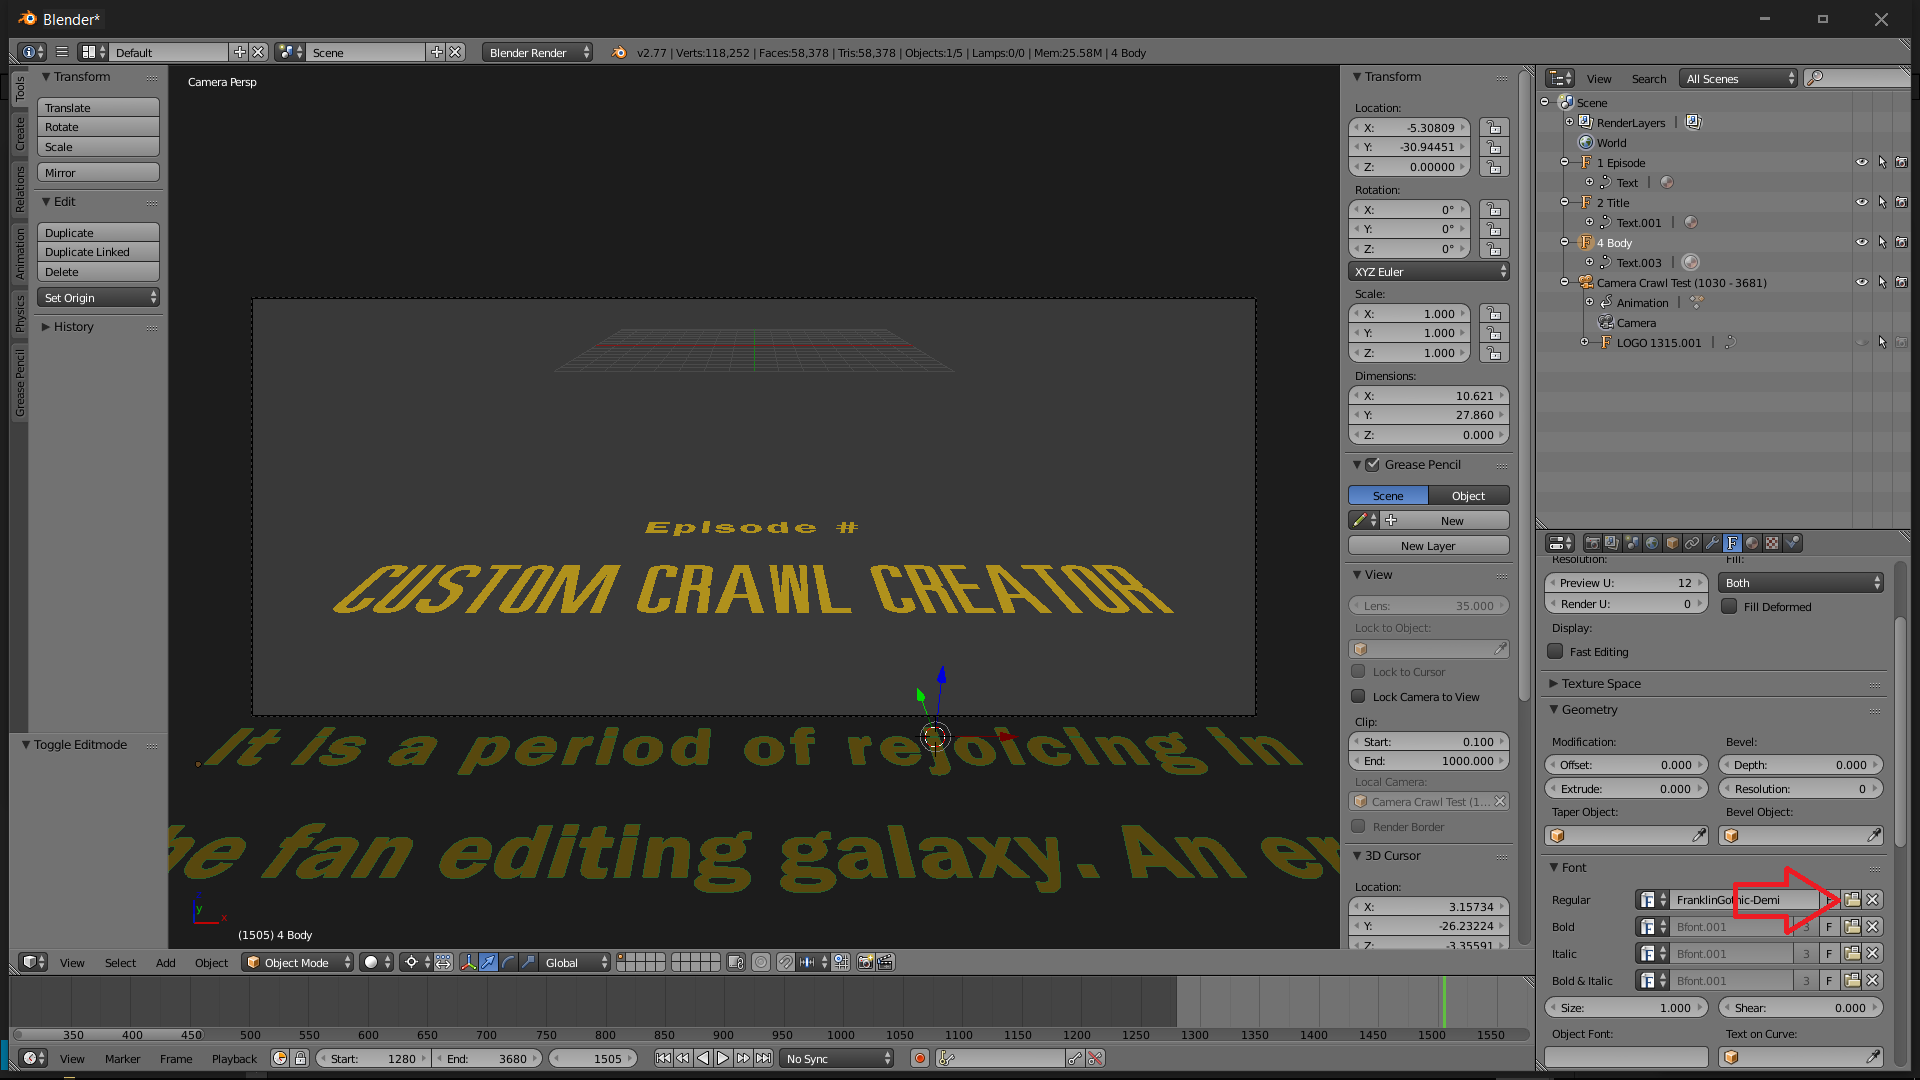
- Then press “tab” to enter into text editing mode and enter your crawl paragraphs;
use ctrl+a to highlight the text and then ctrl+c to copy in your custom crawl - Adjust justified text spacing as needed (adding spaces at the end of paragraphs reduces the gaps between letters and words)
*NOTE: SW crawl usually hold to 30-34 words per paragraph with 4-6 words per line - Press “tab” to exit text editing mode
_Render
- Set the appropriate download location (see “Output Location” visual guide)
- Click “Animation” to render file (the file name will be “1280-3680”)
- If needed, transcode file using Handbrake or your preferred transcoder (Sony Vegas users will need to do this)
I would suggest a lossless transcoding setting in order to preserve the highest quality for your custom crawl
Open the “SW Zoom Out Logo” blender file located in the download folderSet font to “SWCrawlTitle.TTF” found in the download folder; you may need to install the font prior to this step by copying it into your C:\Windows\Fonts\
make sure to press “open font”when it is selected
*NOTE: You will see a single “S” in the blender preview screen until you change the font; this is not an errorSet the appropriate download locationClick “Animation” to render file (the file name will be “790-1180”)If needed, transcode file (Sony Vegas users will need to do this)
Inserting the Logo and Crawl into your NLE:
[img=800x500]https://digmodification.files.wordpress.com/2016/09/sony-vegas-template-preview.png[/img]
*These steps are no longer needed if using the Vegas Project file
Open your NLE software and set settings to 1920 x 1080 and 23.976 fpsInsert the “Border” png file found in the download folder; make sure to put this file above/higher than the rest of the video files and extend approximately 1:40
This acts as a mask that prevents the text of the crawl from showing up out of the video frame as it crawls into the viewing area.Depending on your project, place the “790-1180” SW Logo Zoom out video file in the timeline when the logo naturally appears.Extend the file for ~13 seconds and 10 framesSet a linear fade out for the last 3 secondsApply chroma key filter to file to remove the gray backgroundMove forward 9 seconds and 10 frames from the point the Logo begins and insert the “1280-3680” Crawl video file in the video timeline just below the logo timeline.Adjust the crawl video file so that it runs approximately 1:15 and 16 framesSet a gradual fade to the last 10 seconds and 9 frames of the adjusted crawl lengthApply chroma key filter to file to remove the gray backgroundInsert starfield still from your SW source below the other video files (I would suggest taking a full HD screen capture of the final still shot before the camera pans down at the conclusion of the original crawl)Extend starfield to match length of Border (this should extend past the fade out of the crawl)Adjust as desiredSet color to Studio RGB to match video source- Watch preview and/or render custom crawl
- Smile
If at any time you find yourself confused with using either the SW Zoom Out Logo and Custom Crawl Creator, please send me a PM
Happy Crawling!