- Messages
- 692
- Reaction score
- 1,031
- Trophy Points
- 118
Different software is available to rip discs and to edit video. There is no one “right” approach. This guide provides my preferred methods for maintaining high quality and good compatibility of the final product. It uses makemkv for the rip because it’s free, lossless, and offers support for downgrading UHD drives. MVK format also has robust supporting software (mkvtoolnix) with an easy to use graphical user interface, making it rather straightforward to perform tasks like adding chapters, cover art, or looking up file informaion needed for proper HDR conversion to SDR.
This guide also suggests using the Non Linear Editor (NLE), Davinci Resolve, for its unparalleled color correction capabilities. But of course other good choices are Adobe Premiere and Apple Final Cut. I’ve used both of these in my 1080p edits as well. Those are the three main NLE’s used professionally today. Many experienced faneditors still use Sony Vegas which looks dated but is fully functional.
At a high level, here is the process:
Blu-Ray/UHD Disc > MKV rip > Cineform (or Prores) import to NLE > Cineform (or Prores) export from NLE > MKV Re-encode
Of the above 4 conversion steps, the first is lossless, the next 2 are near lossless, and the final step is lossy. IMPORTANT: If you think you are gaining quality by directly editing a direct blu-ray rip, you aren’t. Because NLE’s do a bad job of exporting your final product to compressed codecs like H264 and HEVC. Using a compressed codec throughout the entire process, e.g., H264, HEVC, will result at best in only fair quality.
For fanedits made from a UHD HDR source, only use Resolve (if you will be doing color correction). It is the only NLE that handles HDR to SDR conversion well. Note that UHD and HDR are not the same thing. UHD relates to the size and resolution while HDR relates to the color and luminosity. If you try and process HDR content as SDR in Premiere, for example, there is a good chance the result will look bad to fair. Resolve (the paid version) on the other hand, can automatically process HDR footage using DolbyVision to convert it to SDR.
Note: To rip from a UHD disc, a downgrade is first required for the firmware on the drive. More information is available on the forums at makemkv.com regarding suitable drives for UHD and how to downgrade them. There you can also find links to purchase already downgraded drives.
STEPS:
1. Use Makemkv to rip the Blu-ray or UHD disc. The result will be a MKV file usually between 30-70 GB.
Keep the highest quality audio when selecting the audio for the rip. This, for example, could be DTS-HD 7.1 surround. Avoid standard DTS or standard Dolby Digital unless this is your only option.
If the movie has subtitles during foreign language parts, keep those intact.
It’s also nice to keep the general subtitles in your edit as a lot of people like having them available. This adds time to the editing process, though, since every point you slice your video you have to slice the subtitle as well.
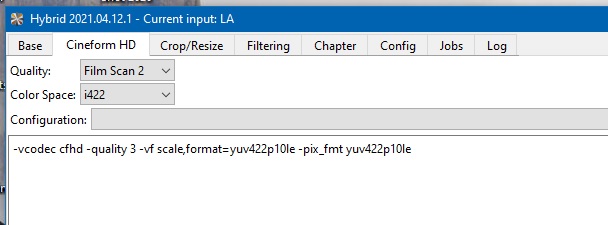
2. Use Hybrid to convert the MKV to Prores (minimum of Prores 422 format, 4444 is better) or Cineform (Film Scan 2). I personally recommend Cineform Film Scan 2 (same perceived quality as Prores 4444 at much smaller file size). I go into even more detail of why Cineform is preferred later on in this guide. Process only the video for this step without any audio. Expect this step to take around two hours for a standard movie, depending on your CPU speed.
3. Use dmMediaConverter to convert the mkv to a 5.1 channel audio file in WAV format. To do this: uncheck the Enabled box for the video stream. Uncheck the Copy box for the audio stream. Highlight the audio stream then select WAV as the codec and select 5.1 for the channels. When you save the filename be sure you add the .wav extension or the program won’t convert it correctly.
If the rip is 7.1 channels still be sure to down convert to 5.1 in this step.
If the resulting WAV file is greater than 4GB, reload the WAV into dmMediaConverter to then split it in half into two files. First, select the job type: Split. Resolve will not import a WAV properly if it is larger than 4GB.
4. Import the Cineform and WAV file or files into Resolve. Do not plan to import a compressed format (such as H264 or HEVC) into an NLE. The editing can become laggy and prone to various errors, including possible choppy video in the final product. All these problems can be easily avoided by using Cineform (or Prores).
If you are determined to edit directly in a compressed format (NOT RECOMMENDED), do not reencode a rip to MP4. You can convert from MKV to MP4 without re-encoding. To ensure the MP4 will work correctly use only Avidemux. Per a tip from @robulon: The settings have an option called Optimize for Streaming that should be set to "Move Index to the beginning of the file" Failure to set this option (or if you use a different program) will likely result in intermittent choppiness of your edit because the MP4 has a weird variable framerate, and NLE’s don’t handle it well.
5. Work your magic and create a fanedit in Resolve. The edit should be done in 5.1 surround.
Once your edit is finished it will need to be exported. The final product will be an MP4 or MKV file using H264 or HEVC ( H265) codecs BUT DO NOT export to these formats from Resolve! This is because Resolve (and Premiere and Final Cut) ALL suck at encoding to compressed formats. If you export directly to H264 or HEVC you will have a release of mediocre quality, with artifacts in darker scenes as well as color banding.
6. From Resolve, export your final edited movie to a QuickTime container (MOV) using the Cineform codec set at best quality (Resolve no longer has Prores exports due to licensing issues). For a 2 hour movie in 4K, expect the resulting filesize to be around 300GB for Cineform. If you were to use DNxHR HQX you would have a file around 600 GB with slightly more “lossyness.” I personally recommend Cineform (Film Scan 2) as an intermediate codec because it provides virtually lossless visual quality at a lower filesize with its variable bitrate. DNxHR in my opinion is very bloated with its constant bitrate. The ‘best” Cineform quality setting in Resolve corresponds to the Cineform “Film Scan 2” setting with a lossyness of “minimal.”
See this chart for confirmation on my quality assertions about Cineform 10-bit Film Scan 2:
https://blog.frame.io/2017/02/13/compare-50-intermediate-codecs/
It is better to process only the video in this step (no audio) to avoid problems with the export process. But if you want you could process the audio into the QuickTime container as well (as an embedded 5.1 channel WAV).
7. After the QuickTime video exports, then export your audio in a separate 5.1 channel WAV file if you didn’t include it in the QuickTime container.
This huge file or files will be your master video and audio files to be re-encoded.
8. Import your master files into Staxrip or Handbrake for the final conversion to MP4 or MKV.Avoid Handbrake if possible. Staxrip uses a full 10-bit pipeline while Handbrake always reverts to 8-bit in the process. [EDIT: Handbrake now uses a full 10-bit pipeline). However, it is critical to set up a debanding filter in Staxrip to get the encode to look good. Otherwise you will have a clear 10-bit picture with very clear and awful banding artifacts.
I suggest using the following x265 parameters in Staxrip:
In the x265 options:
Under basic choose a quality between 20 to 22. 22 should work for 4K encodes, and 20 for 1080p encodes. Be sure the Depth is set at 10-bit.
Under Rate Control, change the AQ Mode to “AQ Auto-variance with bias to dark scenes”
Under Loop Filter, change the Deblocking strength and threshold to -1 and -1. Also uncheck the box for Sample Adaptive Offset. SAO is the enemy of quality.
Under VS filters, go to Add > Restoration > RCR > ColorBanding. Then select f3kdb.
Select edit on audio settings, then change the codec to AAC, uncheck the Normalize box, and change the Quality to 1.00. This will result in perceptually lossless, variable bitrate audio with a 5.1 channel average audio bitrate around 750kbps. This audio should work well in home theatre systems, but be sure to keep your original project audio files or at the very least keep your master audio file if you plan on making additional changes to your edit in the future.
Alternatively, for super HQ audio use the FLAC codec instead of AAC (5.1 channel). This would be the true equivalent of DTS-HD at a much smaller filesize.
If Staxrip is too difficult to set up and use and you like the ease of Handbrake, it will still create a nice looking encode, it just won’t be “true” 10-bit.
Hope this guide was helpful.
This guide also suggests using the Non Linear Editor (NLE), Davinci Resolve, for its unparalleled color correction capabilities. But of course other good choices are Adobe Premiere and Apple Final Cut. I’ve used both of these in my 1080p edits as well. Those are the three main NLE’s used professionally today. Many experienced faneditors still use Sony Vegas which looks dated but is fully functional.
At a high level, here is the process:
Blu-Ray/UHD Disc > MKV rip > Cineform (or Prores) import to NLE > Cineform (or Prores) export from NLE > MKV Re-encode
Of the above 4 conversion steps, the first is lossless, the next 2 are near lossless, and the final step is lossy. IMPORTANT: If you think you are gaining quality by directly editing a direct blu-ray rip, you aren’t. Because NLE’s do a bad job of exporting your final product to compressed codecs like H264 and HEVC. Using a compressed codec throughout the entire process, e.g., H264, HEVC, will result at best in only fair quality.
For fanedits made from a UHD HDR source, only use Resolve (if you will be doing color correction). It is the only NLE that handles HDR to SDR conversion well. Note that UHD and HDR are not the same thing. UHD relates to the size and resolution while HDR relates to the color and luminosity. If you try and process HDR content as SDR in Premiere, for example, there is a good chance the result will look bad to fair. Resolve (the paid version) on the other hand, can automatically process HDR footage using DolbyVision to convert it to SDR.
Note: To rip from a UHD disc, a downgrade is first required for the firmware on the drive. More information is available on the forums at makemkv.com regarding suitable drives for UHD and how to downgrade them. There you can also find links to purchase already downgraded drives.
STEPS:
1. Use Makemkv to rip the Blu-ray or UHD disc. The result will be a MKV file usually between 30-70 GB.
Keep the highest quality audio when selecting the audio for the rip. This, for example, could be DTS-HD 7.1 surround. Avoid standard DTS or standard Dolby Digital unless this is your only option.
If the movie has subtitles during foreign language parts, keep those intact.
It’s also nice to keep the general subtitles in your edit as a lot of people like having them available. This adds time to the editing process, though, since every point you slice your video you have to slice the subtitle as well.
2. Use Hybrid to convert the MKV to Prores (minimum of Prores 422 format, 4444 is better) or Cineform (Film Scan 2). I personally recommend Cineform Film Scan 2 (same perceived quality as Prores 4444 at much smaller file size). I go into even more detail of why Cineform is preferred later on in this guide. Process only the video for this step without any audio. Expect this step to take around two hours for a standard movie, depending on your CPU speed.
3. Use dmMediaConverter to convert the mkv to a 5.1 channel audio file in WAV format. To do this: uncheck the Enabled box for the video stream. Uncheck the Copy box for the audio stream. Highlight the audio stream then select WAV as the codec and select 5.1 for the channels. When you save the filename be sure you add the .wav extension or the program won’t convert it correctly.
If the rip is 7.1 channels still be sure to down convert to 5.1 in this step.
If the resulting WAV file is greater than 4GB, reload the WAV into dmMediaConverter to then split it in half into two files. First, select the job type: Split. Resolve will not import a WAV properly if it is larger than 4GB.
4. Import the Cineform and WAV file or files into Resolve. Do not plan to import a compressed format (such as H264 or HEVC) into an NLE. The editing can become laggy and prone to various errors, including possible choppy video in the final product. All these problems can be easily avoided by using Cineform (or Prores).
If you are determined to edit directly in a compressed format (NOT RECOMMENDED), do not reencode a rip to MP4. You can convert from MKV to MP4 without re-encoding. To ensure the MP4 will work correctly use only Avidemux. Per a tip from @robulon: The settings have an option called Optimize for Streaming that should be set to "Move Index to the beginning of the file" Failure to set this option (or if you use a different program) will likely result in intermittent choppiness of your edit because the MP4 has a weird variable framerate, and NLE’s don’t handle it well.
5. Work your magic and create a fanedit in Resolve. The edit should be done in 5.1 surround.
Once your edit is finished it will need to be exported. The final product will be an MP4 or MKV file using H264 or HEVC ( H265) codecs BUT DO NOT export to these formats from Resolve! This is because Resolve (and Premiere and Final Cut) ALL suck at encoding to compressed formats. If you export directly to H264 or HEVC you will have a release of mediocre quality, with artifacts in darker scenes as well as color banding.
6. From Resolve, export your final edited movie to a QuickTime container (MOV) using the Cineform codec set at best quality (Resolve no longer has Prores exports due to licensing issues). For a 2 hour movie in 4K, expect the resulting filesize to be around 300GB for Cineform. If you were to use DNxHR HQX you would have a file around 600 GB with slightly more “lossyness.” I personally recommend Cineform (Film Scan 2) as an intermediate codec because it provides virtually lossless visual quality at a lower filesize with its variable bitrate. DNxHR in my opinion is very bloated with its constant bitrate. The ‘best” Cineform quality setting in Resolve corresponds to the Cineform “Film Scan 2” setting with a lossyness of “minimal.”
See this chart for confirmation on my quality assertions about Cineform 10-bit Film Scan 2:
https://blog.frame.io/2017/02/13/compare-50-intermediate-codecs/
It is better to process only the video in this step (no audio) to avoid problems with the export process. But if you want you could process the audio into the QuickTime container as well (as an embedded 5.1 channel WAV).
7. After the QuickTime video exports, then export your audio in a separate 5.1 channel WAV file if you didn’t include it in the QuickTime container.
This huge file or files will be your master video and audio files to be re-encoded.
8. Import your master files into Staxrip or Handbrake for the final conversion to MP4 or MKV.
I suggest using the following x265 parameters in Staxrip:
In the x265 options:
Under basic choose a quality between 20 to 22. 22 should work for 4K encodes, and 20 for 1080p encodes. Be sure the Depth is set at 10-bit.
Under Rate Control, change the AQ Mode to “AQ Auto-variance with bias to dark scenes”
Under Loop Filter, change the Deblocking strength and threshold to -1 and -1. Also uncheck the box for Sample Adaptive Offset. SAO is the enemy of quality.
Under VS filters, go to Add > Restoration > RCR > ColorBanding. Then select f3kdb.
Select edit on audio settings, then change the codec to AAC, uncheck the Normalize box, and change the Quality to 1.00. This will result in perceptually lossless, variable bitrate audio with a 5.1 channel average audio bitrate around 750kbps. This audio should work well in home theatre systems, but be sure to keep your original project audio files or at the very least keep your master audio file if you plan on making additional changes to your edit in the future.
Alternatively, for super HQ audio use the FLAC codec instead of AAC (5.1 channel). This would be the true equivalent of DTS-HD at a much smaller filesize.
If Staxrip is too difficult to set up and use and you like the ease of Handbrake, it will still create a nice looking encode, it just won’t be “true” 10-bit.
Hope this guide was helpful.
Last edited: